How to Identify the Queen Bee in Your Hive
This post contains affiliate links. As an Amazon Associate, I earn from qualifying purchases at no extra cost to you.
Finding the queen bee in your hive is one of the most important skills any beekeeper needs to develop. Whether you’re doing a routine inspection, checking for signs of illness, or confirming your hive is healthy, knowing how to spot the queen quickly separates experienced beekeepers from frustrated beginners. In our experience, new beekeepers often spend 20-30 minutes searching when they could locate the queen in two minutes if they knew exactly what to look for.
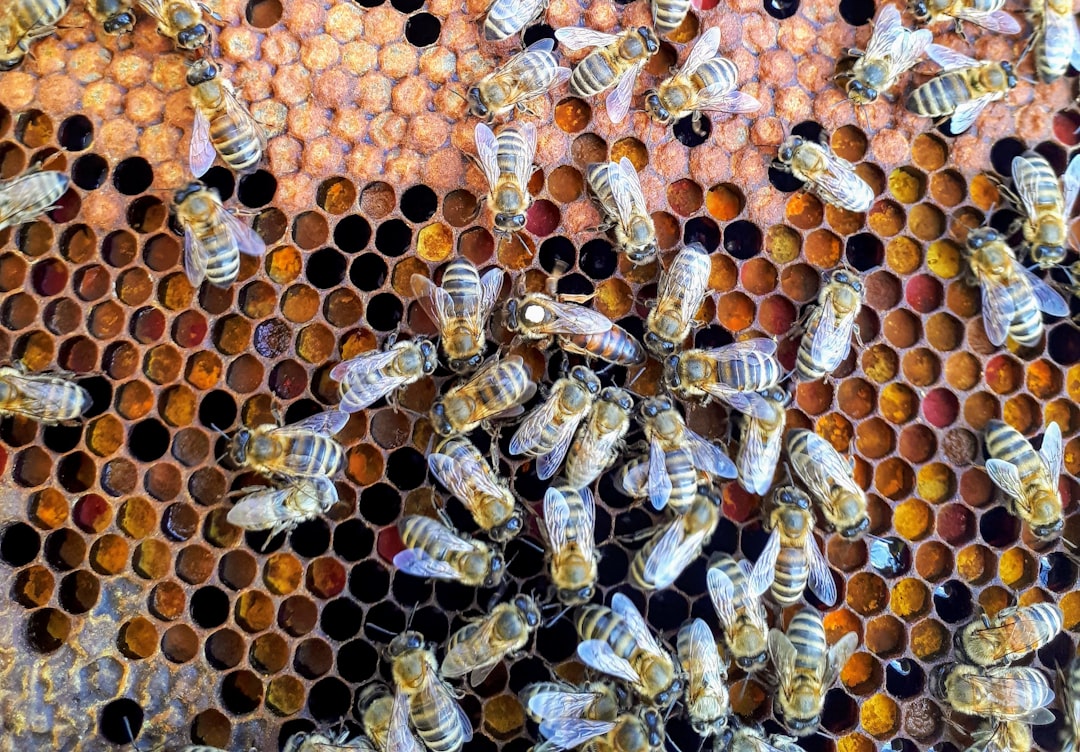
Photo by Boba Jaglicic on Unsplash
This guide covers the physical traits that make queens unmistakable, the best techniques for finding them quickly, and what to do once you’ve located her.
The Physical Differences That Make the Queen Stand Out
The queen bee is not difficult to identify once you know what you’re looking for. Unlike common myths, you don’t need a magnifying glass or special eyesight. The differences between a queen and her workers are substantial enough that they’re visible from several inches away in good light.
Size - The Most Obvious Marker
The most obvious difference is size. A queen is dramatically larger than any other bee in the hive. Her entire body is elongated and thicker, roughly 50-60% larger than a worker bee. When you hold a comb up to the light and scan across it, the queen is the bee that looks like a different species entirely.
Worker bees are roughly 12-15mm long. Queens reach 18-20mm, sometimes longer. That extra length isn’t distributed evenly - it’s concentrated in her abdomen, which extends well below her legs when she’s standing on the comb.
The Abdomen - Length and Shape
The queen’s abdomen is the primary visual clue. It’s not just longer, it’s distinctly pointed and tapers to a smooth point rather than the rounded, segmented look of a worker’s rear. When she walks across the comb, her abdomen drags and curves below the level of the cell edges. Workers walk with their abdomens held more horizontally, flush with their backs.
In our experience, focusing on the abdomen shape rather than trying to measure the entire body makes the queen jump out at you immediately.
The Legs - Less Prominent, More Delicate
Queens have less prominent rear legs than workers. Workers have heavy pollen baskets (corbiculae) on their hind legs - these are noticeably packed with pollen or are at least visible as darker, flattened areas. Queens lack these structures entirely, so their legs look thinner and more delicate overall.
Coloration - Golden or Dark
Queen color varies by subspecies and genetics. Some queens are noticeably golden or reddish-brown, making them visually distinct from their darker workers. Others are nearly as dark as their workers, but the size difference is still absolute. Never rely on color alone - always look for size first.
How Workers Behave Around the Queen
The second way to find the queen is to let the bees show you where she is. Workers constantly attend to the queen, and this behavior is a reliable search tool.
The Retinue - Her Constant Court
The queen is always surrounded by a small group of workers called her retinue. These bees face toward her, tend to her needs, and feed her. They typically form a loose circle or loose line around her body, all oriented toward her. This retinue is usually 8-15 bees thick, though during heavy laying it can expand.
When you’re scanning a frame, look for an area where multiple bees are facing in toward a central point, rather than walking their normal foraging or building patterns. That center point is almost always the queen.
Following the Feed Chain
Worker bees are constantly delivering food to the queen - both pollen and honey. If you see bees with full honey sacs moving toward a specific location and feeding a bee at that spot, follow that chain. It leads to the queen.
Techniques for Finding the Queen Quickly
1. Narrow the Search Area First
Most new beekeepers try to find the queen by examining every single frame. That’s exhausting and unnecessary. The queen is almost always on the brood area - the frames with the most capped brood and open cells. She rarely ventures to honey supers or pollen-heavy frames.
Before you start looking, identify the 2-3 frames that have the densest brood patterns. That’s where the queen lives 95% of the time. You’ve just reduced your search area to maybe 5-10% of the hive.
2. Use Light to Your Advantage
Hold the frame up at an angle so you can backlight it with the sun. The backlighting makes the queen’s large abdomen cast a distinct shadow. This is especially useful on dark-colored queens - the silhouette reveals the size difference that color might hide.
3. Scan in Systematic Rows
Start at the top of the frame and scan from left to right in horizontal lines, moving down the frame about 1-2 inches at a time. Keep your eyes focused on the 1-2 inch band you’re scanning. Move too fast and you’ll miss her; move too slowly and your eyes get tired.
4. Look for the Retinue First, Then the Queen
Rather than hunting for the queen herself, hunt for the cluster of attendant bees. Once you spot that distinctive group of bees all facing inward, the large bee in the center is your queen.
5. Watch Frame by Frame, Not Hive by Hive
When you have multiple frames to check, don’t try to remember whether you saw the queen on frame 4 or 5. Mark the frame with the queen immediately using a queen marker (covered below). You’ll avoid the frustration of thinking you found her and then second-guessing yourself later.
When the Queen Is Not Visible
Sometimes the queen genuinely isn’t visible on any of the brood frames. This happens for several reasons, and it doesn’t always mean something is wrong.
She’s on a Frame You Haven’t Inspected Yet
If you’re checking frames in order and haven’t found her, keep going. Many queens are on the very last frame or two you check.
She’s Hiding on the Bottom Board or Hive Wall
Queens sometimes drop to the bottom during inspections. If you’ve checked all the brood frames and haven’t found her, look on the bottom board. She won’t stay there long, but she may be visible for a few minutes.
She’s in the Queen Cage (New Package)
If you hived a package of bees in the last week, the queen may still be in her release cage. Check for the cage before assuming the queen is missing.
She Actually Is Missing
If you find capped brood (which means there was a queen 9 days ago), multiple sealed queen cells, and no queen on any comb, your queen may be dead or lost. See the section on queenlessness below.
Marking Your Queen - Why You Should Do It
Once you’ve found the queen, consider marking her. Queen marking serves two purposes: it makes her instantly identifiable on future inspections, and it tells you if your queen is the same one you marked or a new replacement.
The Marking Cage Method
Queen marking cages are small cylindrical tubes with brush openings on each end. You gently trap the queen inside, apply a tiny dot of marking paint to her thorax (the middle section of her body, between the head and abdomen), and release her. The paint is non-toxic and designed specifically for bees.
Color By Year
Professional beekeepers use a color code for queen age:
- White = 2021, 2026, 2031
- Yellow = 2022, 2027
- Red = 2023, 2028
- Blue = 2024, 2029
- Green = 2025, 2030
If you marked your queen white this year and you find a white-marked queen next spring, it’s the same queen. If she’s gone, you know your colony re-queened itself. This information is invaluable for understanding colony health and planning interventions.
Signs Your Queen Is Healthy
Once you’ve located your queen, here’s what you should observe to confirm she’s laying well:
Solid Patterns of Capped Brood
A healthy queen lays in a tight, consistent pattern. You’ll see frames that are almost completely filled with capped pupae - this indicates the queen laid eggs across the entire frame 9-10 days ago, and nearly all of them are developing normally.
Open Brood in All Stages
Healthy brood frames show eggs (single cells with tiny white dots at the bottom), larvae (white c-shaped pupae at various sizes), and capped brood all on the same frame. This indicates the queen is laying continuously, not sporadic.
No Spotty Patterns
If the capped brood is scattered with empty cells, or if large patches are empty, this can indicate disease, poor nutrition, or a problem with the queen. Spotty patterns deserve closer attention on your next inspection.
Activity and Confidence
A healthy queen moves confidently across the comb and continues laying without pause while you’re inspecting. She doesn’t dart away or hide. Terrified queens that run constantly may indicate a weak colony or recent re-queening stress.
Queenlessness - What It Looks Like
If you suspect your colony is queenless, here are the signs to look for:
Lack of Fresh Eggs
No eggs visible on any frame after multiple inspections over a week or two. Old brood may still be present (capped pupae from 9+ days ago), but no new eggs means no queen laying.
Multiple Sealed Queen Cells
When workers sense the colony has lost its queen, they typically start building 3-12 queen cells (or more) at random places on the brood comb. These are large, peanut-shaped cells. If you see multiple sealed queen cells and no eggs or young larvae, your colony is responding to queenlessness.
“Laying Workers” - Emergency Egg-Laying by Workers
In desperate circumstances, some worker bees begin laying eggs. These eggs are infertile, so they develop only into drones. You’ll see multiple eggs in a single cell (workers can’t control their laying like queens), and the eggs won’t be centered at the cell bottom. A frame of laying worker eggs looks chaotic compared to queen eggs.
Aggressive or Distressed Behavior
Queenless colonies become defensive and anxious. They’re more likely to sting and more likely to attack the queen if you try to introduce a new one without care. This behavioral shift is often the first clue that something is wrong.
When to Call in Help
If you find your queen is missing and you’re uncertain whether re-queening will work, or if you’re not confident introducing a new queen yourself, contact your local beekeeping club. Most clubs have experienced mentors who can walk you through the re-queening process or even provide a queen.
We’ve helped dozens of beekeepers through their first queen replacement, and the outcome is almost always successful when you act quickly and follow the standard protocols. Your club members have been there.
Key Takeaways
- The queen is 50-60% larger than workers, with a distinctive long, tapered abdomen
- Look for the retinue of attendant bees - they’ll show you where the queen is
- Search only the brood frames where the queen spends 95% of her time
- Mark your queen once found - it makes future inspections trivial
- Solid capped brood patterns and fresh eggs in all stages indicate a healthy queen
- Queenless colonies show no eggs, multiple queen cells, or chaotic laying worker patterns
Finding your queen is a skill that improves dramatically with practice. Your first few attempts may take 10-15 minutes. By your fifth or sixth inspection, you’ll find her in under five minutes. We’ve worked with dozens of beekeepers who were frustrated at first and are now confident queen-spotters. The confidence comes from knowing exactly what you’re looking for.
Recommended Products
Opticron Queen Marking Cage — This is the standard marking cage trusted by professional beekeepers. It’s designed to safely hold the queen while you apply the paint marker. An absolute must-have if you plan to track your queens across seasons.
Honey Bee Health Marking Pens — Non-toxic, quick-drying paint pens in the standard color-coded system. These work with any marking cage. We’ve tested multiple brands and these dry fastest without transferring to your fingers.
Sherriff Beekeeping Gloves — Better visibility and dexterity when searching for the queen. Heavy-duty leather that still lets you use your fingers precisely. Many beekeepers find queen searches frustrating with thick welding gloves; these are our standard recommendation.
Dadant Shallow Brood Frame Assembly Kit — For beekeepers who want to expand their hive and have more brood area to search. Available at Dadant & Sons. Dadant frames are the industry standard.
Mann Lake Premium Bee Smoker — A calm colony is easier to work with during queen searches. The Mann Lake Premium Bee Smoker creates a cool, dense smoke that keeps bees calm without overheating the hive.
Want to Improve Your Inspection Skills?
Once you’ve mastered queen identification, the next skill is reading brood patterns. Check out our guide on reading brood patterns and spotting problems early for a deeper dive into what healthy brood looks like and when you should be concerned.
Have questions about what you’re seeing in your queen cells or brood patterns? Drop a comment below and we’ll help you troubleshoot.