Requeening a Weak Hive: When and How to Replace a Failing Queen
This post contains affiliate links. As an Amazon Associate, I earn from qualifying purchases at no extra cost to you.
A strong colony tolerates a surprising number of management errors. A colony with a failing queen tolerates almost none. Once egg-laying drops off, worker population shrinks faster than it can be replaced, and within six to eight weeks a productive box can become a cluster too small to overwinter. A deteriorating queen rarely offers dramatic early warning signs - by the time you notice half-empty brood frames and a visibly thinner bee population, the colony may already be past the point where a new queen can reverse the decline in time.
Requeening a weak hive is one of the highest-leverage interventions available to a hobbyist beekeeper. Get timing and introduction right, and a colony that looked doomed in September can rebuild to winter-ready strength within four to five weeks. Get it wrong - through a stressed queen, a rushed introduction, or a decision made too late in the season - and you lose the colony anyway plus the cost of the replacement queen. This guide covers reading the earliest failure signs before population loss compounds, deciding when the calendar and colony size make requeening worthwhile rather than combining, and executing an introduction sequence that gives your new queen the best possible chance of acceptance.
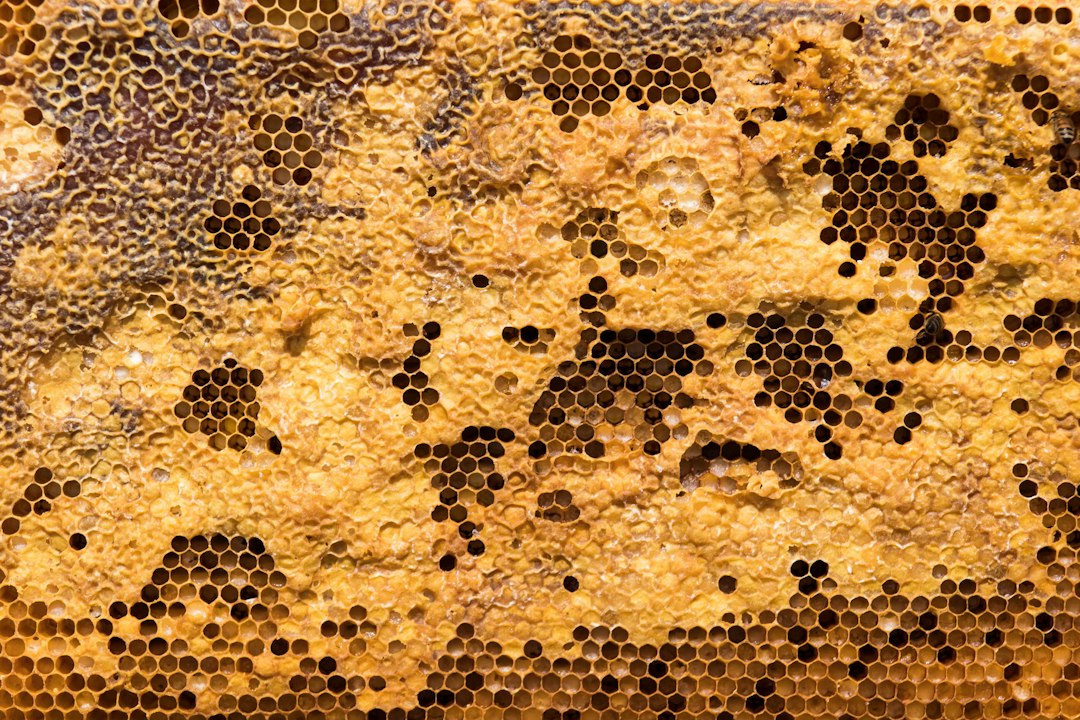
Photo by Meggyn Pomerleau on Unsplash
Signs Your Queen Is Failing and When to Act
A queen rarely deteriorates all at once. The decline follows a predictable pattern, and recognizing each stage tells you how urgently you need to respond.
Spotty or sparse brood pattern. A productive queen covers 80 percent or more of available cells in a brood frame with solid, compact capping. When that coverage drops below 60 percent with randomly scattered empty cells throughout - not clustered at frame edges but distributed across the surface - the queen’s laying rate is already in decline. This is the earliest reliable indicator, appearing weeks before any adult population loss becomes noticeable during inspections.
Eggs on cell walls or multiple eggs per cell. A queen in early reproductive decline sometimes lays erratically, placing eggs on cell side walls rather than the bottom, or depositing more than one egg per cell. Both patterns are clear signs of dysregulated laying. Important caveat: multiple eggs per cell can also indicate laying workers, which develops three or more weeks after a colony goes fully queenless. If a queen is confirmed present during inspection, multiple eggs mean she is failing rather than absent.
Domed cappings in worker-sized cells. A queen who has depleted her stored sperm can no longer fertilize eggs, producing drone brood in worker-cell-sized frames. The resulting cappings are visibly rounded and protrude above the frame surface. This is a late-stage indicator; by the time you see it, the colony is severely compromised and requeening success rates drop sharply.
Shrinking adult population across consecutive inspections. Adults die every day and are replaced only by emerging brood. When the brood nest contracts, adult population follows with a roughly three-week lag. If you observe noticeably fewer bees over six weeks and high varroa load or disease has been ruled out, the queen is likely underperforming.
Queen age approaching or past three years. A queen’s productive lifespan averages two to three years, though genetics and colony conditions influence this. If your marked queen is entering her third season, prophylactic requeening in late summer prevents a crisis rather than responding to one. Always mark new queens at introduction using the international color-code system. The New beekeeper 5 pcs queen bee marking pen set blue red yellow white green posca covers the full five-year rotation — white, yellow, red, green, blue — giving every queen a clear, readable age indicator for routine inspections.
When Requeening a Weak Hive Is Worth It
Not every weak hive benefits from a new queen. The decision hinges on three variables: adult bee population, time of year, and the root cause of the weakness.
Population floor. A colony needs at least four to five frames of bees to give a newly introduced queen realistic odds of acceptance and survival. Below that threshold, the colony cannot generate enough heat to protect the queen cage, and stressed or near-starving workers are far more likely to reject any queen regardless of introduction technique. At three frames or fewer in late September in a cold climate, combining with a healthy colony is almost always the smarter decision. See How To Combine Weak Hives Safely for the newspaper method, population thresholds, and timing guidance.
Calendar window. The optimal requeening period for most of North America runs from late July through mid-September. A queen introduced by mid-September has time to complete a full egg-to-adult cycle and begin producing winter bees before brood rearing tapers off. Attempting a queen introduction in mid-October in USDA hardiness zones 4 through 6 is a gamble: you may not have a laying queen before temperatures make effective inspections impractical, and the colony may not raise a sufficient winter population regardless. In zones 8 and higher, the workable window extends several weeks later.
Rule out other causes first. High varroa mite load suppresses brood production and shortens worker lifespan in ways that closely mimic queen failure. Nosema reduces forager populations and can shrink a colony even with a healthy queen. Before ordering a replacement, take a mite wash or alcohol roll to confirm mite levels are at or below the treatment threshold. Requeening a colony with untreated infestation addresses one symptom while leaving the underlying cause intact.
A quick decision framework:
| Situation | Recommended Action |
|---|---|
| Clear queen failure signs, 5+ frames of bees, before Aug 15 | Requeen immediately |
| Clear queen failure signs, 5+ frames of bees, Aug 15 to Sep 15 | Requeen with urgency; aim for laying queen within 2 weeks |
| Clear queen failure signs, 5+ frames of bees, Sep 16 to Oct 15 (zones 4-6) | Combine if possible; requeen only if colony is still vigorous |
| Fewer than 3-4 frames of bees, any date | Combine; do not attempt requeening |
| Drone layer confirmed, population severely reduced | Combine; introduction success rate is very low |
| Preventive requeening, queen 2+ years old, healthy colony | Any point during the main active season |
Finding and Removing the Old Queen Before Requeening
You cannot introduce a new queen while the old queen is still in the hive. If both are present simultaneously, the colony will almost certainly locate and kill the newcomer within hours. A failing queen is often harder to find than a healthy one because she moves slowly through a thinned population with few attendant bees clustering visibly around her.
Start with proper smoker technique. A well-managed inspection with calm, cool smoke gives bees time to move off frames deliberately rather than scrambling, making it significantly easier to spot the queen. The Bee Hive Smoker Kit – Stainless Steel Smoker with Heat Shield, Practical Beekeeping Supplies for Beginners & Professionals is a stainless steel smoker with a heat shield suited for beekeepers at all experience levels. Use light puffs at the entrance and briefly under the inner cover; heavy or hot smoke drives the queen deep into crevices and makes the search significantly harder.
Work systematically from the outside in. Remove outer honey frames first and set them aside without shaking - the queen is almost never on these. Work inward toward the brood nest, looking for the largest individual bee on each frame surface. In a weak hive where bee density is lower than normal, she is often clearly visible on a patchy brood frame where open cells are available for laying. Even when you are about to remove her, marking her first confirms you have the right bee and prevents confusion while working through the brood nest; the international color for 2026 is blue.
Wear full protective equipment throughout. Finding and removing a queen requires slow, close-range frame work near the brood center. Even colonies that behave calmly during routine inspections can respond defensively during an extended search. Full veil, gloves, and a jacket or full suit are the appropriate protection level for this task.
Remove her entirely from the hive. Do not leave the old queen in a clip cage inside the hive while waiting for the replacement to arrive. A caged queen still emits queen mandibular pheromone; the colony does not register as fully queenless, and workers may be significantly less receptive to an introduced replacement. Remove her completely and wait at least one to two hours before installing the new queen - many experienced beekeepers prefer a full 24 hours to allow queenlessness signals to diffuse through the entire colony.
Step-by-Step: How to Introduce a Replacement Queen for Requeening Success
Queen introduction is a multi-day process, not a single action. The Benton candy-plug cage method is the most widely used technique for hobbyist requeening and has a strong track record when the following sequence is followed precisely.
-
Confirm the hive is fully queenless and free of queen cells. Before the replacement arrives, do a final thorough inspection of every brood frame. Look for the rounded, peanut-shaped profile of emergency queen cells - capped and uncapped - including along the lower and side bar edges. Remove every one you find. A colony that has already invested in raising its own candidate may kill your purchased queen to protect that investment.
-
Receive and store the new queen correctly. A mailed queen typically arrives in a Benton cage with a candy plug and three to five attendant bees. She can be held 24 to 48 hours at room temperature (65 to 72 degrees Fahrenheit) away from direct sunlight if you cannot install her immediately. Do not refrigerate her. Confirm she is alive and mobile by tilting the cage gently before you open the hive.
-
Remove only the cork from the candy-plug end. Most Benton cages have a cork at each end. Remove only the candy-end cork, allowing worker bees to eat through the sugar plug over 24 to 48 hours and giving the colony time to acclimate to the new queen’s pheromone profile before she walks freely into the hive. The direct-release end stays sealed.
-
Install the cage in the center of the brood nest. Wedge the cage candy-side up between two central brood frames with the screen face exposed to the bees, so workers can feed and interact with the queen through the mesh. Candy-side up prevents dead attendant bees from blocking the release plug. The cage must be firmly placed so it cannot fall to the bottom board.
-
Place a queen excluder over the brood box. Fitting a Mann Lake Queen Excluder for Beekeeping, Precision Welded Low Carbon Steel over the brood box before adding any supers keeps the newly released queen in the brood zone during the critical establishment phase, preventing her from wandering into a remote honey super where temperature regulation is poorer and where an early, patchy laying pattern can develop far from the main cluster.
-
Leave the hive completely undisturbed for five to seven days. Every inspection during this window disrupts the pheromone environment, stresses the colony, and increases rejection risk. Mark day five on your calendar and honor it. There is no useful information you can gather from opening earlier that is worth the acceptance risk.
-
Check for release and early eggs on day 5–7. Open the hive and locate the cage. If the candy has been consumed and the queen is gone, inspect for eggs - tiny white cylinders standing upright in the base of cells, visible by holding the frame at a slight angle toward bright light. Finding eggs confirms the queen is alive and laying. If she is still in the cage with candy partially eaten, close the hive for another two days.
-
Confirm a solid brood pattern at day 14. Two weeks after introduction, inspect for a compact, dense brood pattern establishing across two to three central frames. This is the definitive confirmation of a successful requeening. A sparse pattern or no brood at day 14 indicates failure; determine whether the colony raised its own queen from a missed cell before deciding whether to source another replacement.
Choosing the Right Replacement Queen for Your Requeening
Queen selection shapes your colony’s genetics, temperament, and productivity for the next two to three years. The wrong choice can mean a colony that is technically functional but consistently underproduces.
Locally raised queens offer tangible advantages. A queen raised near your apiary has been mated with local drones and is already adapted to regional forage patterns, local pathogen pressures, and climate cycles. Penn State Extension beekeeping resources and multiple university extension studies consistently find locally adapted queens outperform imported stock for overwintering success in northern climates. If you have intermediate-level skills, learning to raise queens from your strongest colony provides the best long-term genetic investment for your apiary.
Race and trait selection for purchased queens. Italian queens are prolific, calm, and well-suited to beginners and high-production flow regions. Carniolan queens winter on a smaller cluster and build up rapidly in spring, making them a strong choice for northern climates where colony size heading into winter is critical. Russian bees carry documented genetic resistance to varroa and tracheal mites - a meaningful advantage if you prefer lower treatment intensity. Hygienic-trait testing data, when provided by a supplier, indicates queens whose workers remove varroa-infected brood, contributing to lower mite levels between treatment cycles.
Vet your supplier and order early. A queen that arrives weak, injured, or in a cage with no living attendants has dramatically reduced acceptance odds regardless of how precisely you execute the introduction. Order from suppliers who guarantee live delivery, ship with three to five healthy attendants per cage, and provide documentation on queen age and mating status. The Honey Bee Health Coalition publishes practical guidance on queen quality indicators and what healthy introduction success rates look like. Reputable producers sell out during peak demand in August and early September - if you plan to requeen in late summer, place your order no later than mid-July to avoid delayed shipping or suboptimal queen quality.
Common Requeening Mistakes That Kill New Queens
Most queen introduction failures are preventable and fall into a small number of repeatable patterns worth knowing before you open your first hive with a queen cage in hand.
Introducing the queen before the colony has processed queenlessness. Removing the old queen and immediately installing the replacement does not work reliably. Queenlessness signals spread through pheromone diffusion and worker-to-worker contact - a process that takes time. Wait at minimum one to two hours; 24 hours is better practice, especially in large or dense colonies where signal diffusion takes longer to reach every bee in the cluster.
Missing emergency queen cells before introduction. When a colony detects queenlessness, it begins converting young female larvae into queen cells within hours. If you install a new queen cage without first removing all developing cells, the colony will likely complete one and the emerging virgin will locate and kill your introduced queen. Check every brood frame, including along the bottom bars and lower frame edges where emergency cells are frequently started.
Opening the hive during the five-to-seven-day acceptance window. Every inspection during that window disrupts pheromone gradients and risks the queen being crushed in a propolis-sticky frame gap or balled by defensive workers. Mark day five on your calendar and do not open before that date regardless of curiosity or concern.
Using direct release in a stressed or weak colony. Direct release - opening both cage ends and letting the queen walk immediately into the hive - bypasses the pheromone acclimatization period and sharply increases the probability of balling. It is sometimes appropriate for colonies queenless for three or more weeks under specific circumstances, but is poor practice for most hobbyist requeening situations.
Requeening without first treating high varroa levels. Varroa-associated viruses suppress brood health and shorten worker lifespan. If your mite count is above the treatment threshold, treat first, complete the full treatment cycle, and then requeen. A good queen introduced into a mite-infested colony does not correct the underlying problem.
Accepting a queen in poor shipping condition. A lethargic queen, one with missing or damaged legs, or one in a cage with no living attendants has significantly lower acceptance odds. Contact your supplier immediately about a replacement rather than attempting an introduction with a compromised queen and hoping the colony compensates.
Frequently Asked Questions About Requeening a Weak Hive
How long does it take a weak hive to recover after requeening?
Recovery timeline depends primarily on adult bee population at the time of requeening and the season. After a successful introduction, allow roughly three days before the queen begins consistent laying, 21 days for the first new workers to emerge, and four to six weeks before a meaningful population increase is visible. A colony with five or more frames of bees requeened in August can realistically rebuild to eight to ten frames by mid-October. A colony at three frames requeened in late September faces a harder trajectory; even a perfectly accepted queen may not produce enough winter bees before cold sets in. Adult population at requeening, not queen quality alone, is the primary variable in recovery speed.
Can you requeen a hive that has already become a drone layer?
Technically yes, but the success rate is low enough that combining is almost always the smarter choice for hobbyists. A drone-layer colony has typically been queenless for four or more weeks, and laying worker pheromones actively suppress acceptance of any introduced queen. The conventional approach is to shake all bees off every frame approximately 100 feet from the hive so laying workers mostly do not return, then introduce a new queen immediately to the depopulated colony. This method is disruptive and inconsistent. For most small-scale operations, a newspaper combine with a healthy hive preserves more bees and better genetic material than a low-probability direct requeening attempt.
How do you confirm a requeening was successful?
The most reliable confirmation is finding eggs five to seven days after the queen was released from the cage. Eggs are tiny white cylinders standing upright in cell bottoms, visible by holding the frame at a slight angle toward bright light. Young larvae at days 10 to 12 provide a secondary confirmation. The definitive sign is a solid, compact brood pattern spanning two to three central frames at day 14. If you find empty cells or pollen-only frames in the brood area with no eggs after seven days, the introduction likely failed and the colony may be raising an emergency queen from a cell you missed.
Requeening a weak hive is, at its core, a timing and sequencing problem. The bees will accept a replacement queen when conditions are correct: the colony genuinely registers queenlessness, the old queen is fully gone, the adult population is large enough to sustain the introduction period, and the calendar allows enough time for a new brood cycle to matter. Miss any one of those conditions and the intervention fails regardless of queen quality or introduction technique. Start with an honest assessment - confirm queen failure, rule out varroa and disease, count frames of bees, and check the calendar against your climate zone. Then act early and decisively. A new queen ordered when you first see a spotty brood pattern in August has a far better outcome profile than one ordered in late-season panic. Use the decision framework in this guide every time you open a hive that looks weaker than expected, and you will catch most failing queens before the situation becomes unrecoverable.
If you found this guide useful, bookmark it for your late-summer inspection rounds or share it with a fellow beekeeper heading into their first requeening season.